vrijdag 22 februari 2013

Start your weekend with a smile!

Hi all,


As much as we like to work hard, we also like to have a good laugh.
This laugh can be brought to us by listening silly songs, telling stupid stories or making wacky sounds ourselves.
But there's another thing that can put a smile on our face: the game comments players add to our games!


What do players think while playing our games?


Players just say the funniest things. And we made a small selection for you!
So sit back... and enjoy!

Cheers,
Shirley


 And can you guess the games of these comments?

woensdag 20 februari 2013

Lightmapped tinting

Dear readers,

Today I'd like to explain a technique we're using in our new game considering lighting. It involves using the lightmap to shade models like bullet impacts and characters. A lightmap is actually just another texture applied to a model in combination with the second texture coordinates. The lightmap is blended with the primary texture to obtain a model that is shaded without there being any (hardware) light in the scene. The reason this is done is because it is much faster to render than real-time lighting/shadows. The downside is that it is computed beforehand and so is static (i.e. not real-time). Below you see an example of a scene that uses a lightmap for shading and below that an example of what a lightmap texture looks like.

An example of a lightmapped scene, notice the shadows of the trees and hills.

An example of a lightmap texture. You can see the shadows of trees and buildings in this texture.

Now what we'd like is that when a character walks through the scene and walk into a shaded area, the character also becomes darker (because it's walking in the shade). To do this we cast a ray from the character onto the ground and get the second texture coordinate of the point on the ground. We then use this color on the character material and in this way it'll shade appropriately.

A character in light on the left and in shadow on the right.
This also works for other objects such as bullet holes, but care should be taken. As bullet holes share the same material, adjusting the color on that material changes the appearence of all bullet holes which is not what we want (as some are in light, others in shadow). Creating a separate material for each bullet hole is possible, but not desirable: it slows down rendering. Instead we create just two materials: one for in light, the other for in shadow and assign one of the two materials to the bullet hole depending on whether it is in light or shadow.
 
Bullet holes in light on the left and in shadow on the right.
-- Stijn

maandag 18 februari 2013

Designing and building an interface

Hi guys,

Today I'm going to show you some tips and tricks on how we design and build our interfaces here at Xform.
Always start with a good game and interface design document before starting the interface design in Photoshop. You need to have a good idea of all the elements that need to be displayed on screen and also when an interface element is displayed.

When I setup a file I always start by creating layer folders and sub folders in Photoshop. As you can see in the right column in the image below, I've created an Interface folder which contains all the elements of the interface in sub folders. This makes it easy to turn separate or unique interface elements on and off. This also prevents me from cloning a lot of graphic elements which are used in multiple screens, like the speedometer.

When all screens are done I setup layer compositions (left column of the image below) to make it even easier to switch between all the possible interface screens. Setting a layer compositions doesn't actually change anything in your Photoshop file, it only remembers which layers have to be turned on or off when it's selected. Don't forget to use this tool, it can save you a lot of time!

Interface mock-up in Photoshop 

When the mock-up is approved it's time to turn the interface elements into a compact texture. Here I've chosen to work with an 512x512px texture. All the elements I need are placed in a grid of 16x16 pixels. It's very important for me to work inside this grid since we'll use the same mesh grid in 3ds Max.

512x512 px texture. Photoshop grid size 16x16px
 
The final textures will be imported in 3ds Max and placed on a plane of the same dimensions: 512x512 units. To "recreate" the Photoshop grid we set the length and width segments to 32x32, which creates squares of 16x16 units. This makes it easy for me to cut-up the plane into separate interface elements.

512x512 px texture on a 512x512 units 3D plane divided in 32x32 segments

The elements are set into place in an orthographic view using the original Photoshop image as a template. Although the interface is created in a 3D software program it'll still be displayed as an 2D interface. Therefore we use an orthographic view instead of an perspective view.
As you can see in the lower part of the image below the elements are ordered in 3D space, but will be rendered in game as seen in the top area of the image below. The white boxes on top of the interface are used to display dynamic text, like weapon and enemy names.

Interface in 3ds Max. Top orthographic view. Bottom Perspective view.
 
When the max file is done our programmers will have to make the interface work in game. And there you have it... a working interface!
 
Final in-game interface

Cheers,
Matt

donderdag 14 februari 2013

Mud madness dirt cross car racing game

Hey everyone!

Congrats to the winners of the Burnin Rubber contest! Good job!

Last couple of weeks I’ve been working on the Mud Madness Dirt Cross Car Race game.
I did some optimizing off the tracks, made some small menu changes and animations.

But now I’m going to show you some of the menu backgrounds I made.
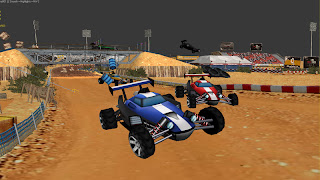
I started with making a nice setup for my menu background. Used one of our tracks, placed some cars in it and played with the camera a bit 'till I got the view I wanted.
Then I made a print screen of the viewport in 3Ds max and placed it as my background of the menu. 
You have all seen this in my last blog post. This is how it looked like:

Step 1

After I made the environment a bit smoother, I rendered the diffuse map without the cars first.
I need those separated in the photoshop file.
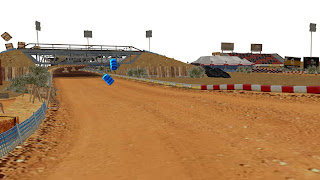
Step 2


After that I placed a direct light and renderd the shadows, then I rendered it with a skylight, then an ambient occlusion map.
After some work in Photoshop, I got this as a result:
 
Step 3

Now it was time to start rendering the cars. First I made the cars a bit smoother.
I decided to render the front car as first, then the cars in the back. And just like the environment I rendered the diffuse map first, then a render with a skylight and an ambient occlusion map.
After some work in photoshop I got this result:
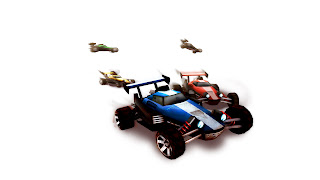
 
Step 4

Now it was time to add everything in one photoshop file and add some dirt spats, mud, etc. So it would feel like an action shot and not a fancy rendered background.
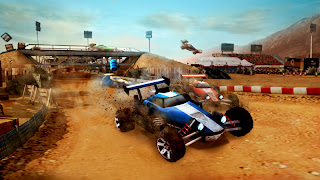
 

Final!

That’s all for now!

Hails,
Eugène

donderdag 7 februari 2013

Mockup using loft

Hi there!

First I want to tell you that our new car crash game Traffic Slam 3 has been released! It is free to play, so check it out and have fun :)! It was a fun project to work on, I also learned a few new things here and there during development.

Of course we haven't been sitting around eating sandwiches with chees on top.. No.. we have started a new project and I've been working on the mockup environment to be used in the alpha version. It is a bit of a unique project compared to our usual games we make. Such as a racing or a shooter game. It is a more 'move from point a to point b' kind of game, which I like.


I want to show you a quick trick on how I made the mockup. The level is a kind of 'path' from the start location towards the end. The 'path' is the main part of the environment, everything is built around it. I made a spline using the shape tools in 3dsmax. Then I used a compound object called 'Loft', to generate the main path mesh from the spline. 

Loft also has the ability to auto generate UV coordinates which is very nice. When generating a mesh from the spline you have to tell the loft modifier what kind of mesh 'slice' or mesh 'shape' you want to use. I made it way wider than the road would be most of the time. Then I deleted moest of the widest parts again, except for the places where I wanted them to be. 


Next to the ground mesh of the mockup I also worked on the placement of some of the assets we want the level to have. And made one part of the level more detailed, to give ourselves an idea of what it could look like in the final stages.

Thats it for now! Until next time,
Joep

vrijdag 1 februari 2013

Mud Racing Madness


Hi guys!

A new update for one of our upcoming releases!
One of our race games! And no not BR5!
Our mud racer! The game is making lots of progress the last couple of weeks.
Most of the art is almost finished but the finishing touch is still missing. So we are very busy with finalizing my code and tweak/improve the texture. And of course most important, the performance.

We are trying to get the best out of Flash 3d and the last week it was very challenging for myself to improve my code. A nice project to keep myself busy for a week:) 


We need to know on what environment type we are driving, driving on different types of environment means different settings. In water we need more drag, on oil it needs to be uncontrollable. So the detection of different types of environments is very important since it changes your car behavior. In the beginning we just had those 2, but later on we got more. So the system had to be improved! There are several ways to do this but I choose to check on mesh names
Easy way and quick way:) since we already know we have collision with the ground.. The only thing we need to do is slice the ground in more parts.
When we know the type of ground we can give the car a new set of properties. Those settings can be like  drag, speed limiter, sound, particles, etc..


So since I'm working on this part of improvement, my brother Eugene is improving the tracks that were created. Mostly to slice the parts and duplicate so we can use those for our physics system.
I'm not going into details but it's easier for flash that those models will have less triangles.


Everyone good luck with the BR5 contest!!

One last image:)


Greeting, Michael